Step 1: Installing the Windows 95 Dial-Up Adapter
Installing Windows 95 Dial-Up Networking for Albury Local InternetFull instructions are provided here for Albury Local Internet subscribers wishing to set up Windows 95/98's Dial-Up Networking.
Please note: If you miss any of the steps required, or incorrectly enter something where you shouldn't, these instructions WILL NOT WORK! You MUST follow the instructions implicitly.
|

|
Step 1: Installing the Windows 95 Dial-Up Adapter
|
Before you set up the Windows 95 Dial-Up Adapter, you need to have the
following installed:
|
|
To install the programs you need, double click on:
|


|
|
This Network window will open: If the Network Components Installed window is blank, or if you do not have all the required components (see list above), you will need to install them. Click on Add. |

|
|
To install the Client for Microsoft Networks, select Client and click on Add. |

|
|
Select Microsoft and Client for Microsoft Networks as shown
here:
Click on OK to close this window. You may be asked for your CD or installation disks, so have them on hand. |

|
| Next, install your Adapter if it's not already installed by selecting Adapter and clicking on Add. |

|
|
Install your adapter (if necessary), by selecting Microsoft, then
Dial-Up Adapter as shown here:
Click on OK to close this window and return to the Network Component selector. |

|
|
The next step is to install the Protocol.
Select Protocol and Add. |

|
|
Select Microsoft, TCP/IP and click on OK.
Click on OK to close this window and return to the Network Component selector. |

|
|
The next step is to remove any protocols or adapters that are not necessary.
You should be able to quite safely remove the NetBEUI and IPX/SPX protocols
unless you know you need them for something else, and they were there
before we installed the Microsoft Client.
To remove any unwanted entries, highlight them and click on Remove. You should be left with Client for Microsoft Networks, Dial-Up Adapter and TCP/IP (plus any network adapters or protocols that were there originally and are necessary for the operation of your computer and/or network).
|

|
Now, we need to configure the various components we have just installed.

|
Step 2: Configuring the Windows 95 Dial-Up Adapter
|
| The components just installed (Client for Microsoft Networks, Dial-Up Adapter and TCP/IP) need to be configured properly to work. |
| At the Network window highlight Client for Microsoft Networks and click on the Properties button: |

|
| Ensure the General Properties are set according to the following illustration, then click on OK. |

|
|
Next, select Dial-Up Adapter and Properties:
Set the Dial-Up Adapter properties according to the following illustrations. |

|
|
Click on the Driver Type tab if it does not open automatically at
that window for you.
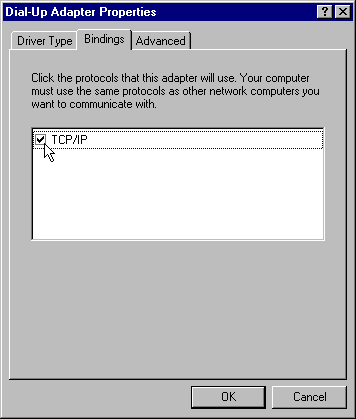
For Driver Type select (click on) Enhanced mode (32 bit and 16 bit) NDIS driver (some flavours of Windows 95 may word this slightly differently). Next, click on the Bindings tab. |

|
|
Select the TCP/IP protocol as shown:
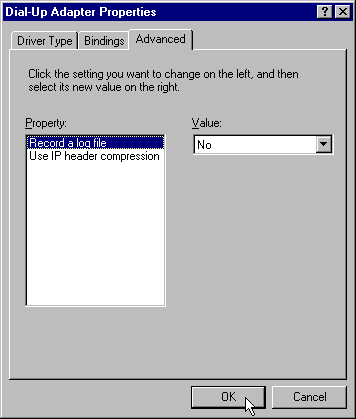
Next, click on the Advanced tab. |

|
|
Select both options - Record a log file and Use IP header
compression and set the Value of both to No.
Once you have configured all three Dial-Up Adapter Properties click on OK to proceed. |

|
|
Set the TCP/IP properties according to the illustrations on the
following pages. To step through the various windows click on the appropriate
tabs at the top. Be careful to match the window you are configuring with the
illustration, and don't miss any.
Select TCP/IP and click Properties. |

|
| For IP Address select Obtain an IP address automatically. Ensure the Specify an IP address option is NOT selected, and the IP Address and Subnet Mask are blank. |

|
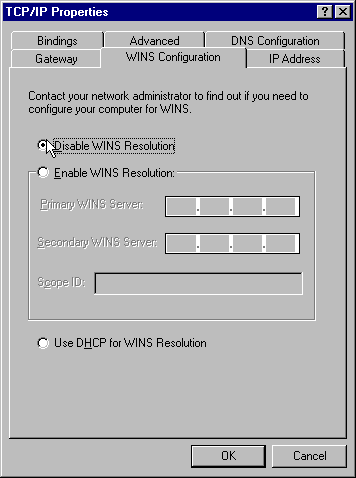
| For WINS Configuration select Disable WINS Resolution. Ensure the rest of the configuration window is blank as shown here. |

|
| In the Gateway window, click in the New gateway window and enter 203.15.244.10 as indicated, then click on Add. this will add 203.15.244.10 into your Installed gateways window. |

|
| In the Bindings window ensure the Client for Microsoft Networks option is ticked. If not, click on the box to enable it. |

|
| In the bottom of this window click on the Set this protocol to be the default protocol. |

|
|
In the DNS Configuration window, click on Enable DNS.
In the Host box enter your username. In the Domain box, enter albury.net.au Don't enter anything in the DNS Server Search Order or Domain Suffix Search Order boxes. When ALL six windows have been configured, click on OK to continue. |

|
|
You should have noticed by now that you have two other tabs at the top of the
Network window - Identification and Access Control.
For Computer name we recommend you use your username. For Workgroup, set it as WORKGROUP. For Computer Description you may enter anything you wish. |

|
|
Configure the Access Control window as shown and click on OK.
You will be asked to restart your system. Do so now. |

|
| When your computer has completed it's restart, double click on My Computer. |

|
| You should now have a Dial-Up Networking icon in the My Computer window: |

|
|
If you don't see the Dial-Up Networking icon in the My Computer, you should be able to find it by going to Start, Programs, Accessories, and Dial-Up Networking:
|
| To add the Dial-Up Networking icon to My Computer group, click on Control Panel and Add/Remove Programs. Select Windows Setup, Communications, click Details and select Dial-Up Networking. |


|
|
|
|
Double click on the Dial-Up Networking icon, and Make New Connection. |


|
| Click on Next. |

|
| Type in 'Albury Local Internet' where indicated, click on the arrow at the end of the Select a modem box, select your modem from the drop down list, and click on Configure. |

|
|
In the General window, select the COM port your modem is attached to.
Leave the speaker volume where it is so you can hear what your modem is doing.
Select the maximum speed your modem is capable of according to the table. Leave the Only connect at this speed box un-checked (empty). |

|
|
||||||||||||||||||||||
|
Click on the Connection tab.
Configure this window as indicated above. Leave the Port Settings and Advanced buttons alone. Don't change anything in the Options tab. Click OK to return to the Main Connection window. |

|
|||||||||||||||||||||
| Back at the Make New Connection window, click on Next. |

|
|||||||||||||||||||||
|
Enter your local call data number, area code and select country here.
For residents of Albury-Wodonga and surrounding areas, your local call data
number will be 60517000. Subscribers outside local call to this number
should contact Albury Local Internet for their local call data number.
Click on Next. |

|
|||||||||||||||||||||
|
You should be presented with this last window:
Click on Finish. |

|
|||||||||||||||||||||
| You should now have an icon for Albury Local Internet in your Dial-Up Networking window. |

|
|||||||||||||||||||||
|
Now we need to set the Properties for the connection.
Click your right mouse button on the Albury Local Internet button. A small window should appear as shown - click on Properties. |

|
|||||||||||||||||||||
| The main entries should be set as indicated below using your local call number as before. Click on Server Type. |

|
|||||||||||||||||||||
|
Configure this window as shown:
For Type of Dial-Up Server select PPP: Windows 95, Windows NT 3.5, Internet. Make sure nothing is selected in the Advanced Options section. In Allowed network protocols only TCP/IP should be selected. Next, click on TCP/IP Settings... |

|
|||||||||||||||||||||
|
In TCP/IP Settings select Server assigned IP address.
Select Specify name server addresses and configure Primary and Secondary DNS as shown: Do not configure the WINS entries. Ensure Use IP header compression is NOT ticked, and select Use default gateway on remote network. Click on OK to close all windows back to Dial-Up Networking. You may wish to create a shortcut for your newly created dialler on your desktop. Right mouse click on the Albury Local Internet icon, and select Create Shortcut. Answer "Yes" to the dialog box. A shortcut will be placed on your desktop.
|

|
|
Scripting automates the login process for you, automatically entering
your username and password.
Early versions of Windows 95 did not include scripting support as part of the base installation. If you are running one of these versions, you will need to install support for scripting.
|
|
First, you need to install the Albury Local Internet script on your computer.
Insert Disk 1 of the installation diskettes in your computer's floppy drive,
then click Start, Run, and type in the box:
a:\script And press Enter. The script will be copied to your computer. Close the window as indicated. |

|
| To check if you need to install Dial-Up Scripting Support: |
| Right-click on My Computer, and select Properties. The version of Windows you are running is found under the System section. If the version of Windows 95 you are running is 4.00.950 or 4.00.950A, you will need to install scripting support. If you are running a later version (eg 4.00.950B, 4.00.950C or Windows 98), scripting support is already available and you can skip to the next step. Otherwise, read on... |

|
| If you originally received your copy of Windows 95 on CD, you can install the scripting tool from that disc. However, this version of the software is often not stable, and will crash frequently. Microsoft have released an updated version: Albury Local Internet STRONGLY recommend you use this version. This version is far more stable, and easier to install. |
|
Click here to obtain the scripting tool. You will
be prompted to save the file to disk; save the file in
C:\Program Files\Accessories.
|

|
| Click Start, Programs, Windows Explorer. Select the Program Files folder, then the Accessories folder underneath it. On the right hand side of the Explorer window, you will find the script.exe file (it may be simply called 'script'). Double click it. When installation is finished, you will see a window telling you installation is complete. |

|
|
Now, start the scripting tool. Click Start, Programs,
Accessories, Dial-Up Scripting Tool. The following window
appears:
Make sure Albury Local Internet is highlighted on the left hand side. Type in the path to the script as shown, click Apply, then Close. Skip to the end. |

|
|
|
|
Double click on the Dial-Up Networking icon.
|

|
|
Click your right mouse button on the Albury Local Internet button.
A small window should appear as shown - click on Properties. |

|
|
Select the Scripting tab:
Type in c:\windows\albury.scp as shown: Click on OK. |

|

|
Step 3: Using the Windows 95 Dial-Up Adapter
|
|
Make sure your modem is plugged in correctly and turned on.
Double click on the Albury Local Internet icon you have created:
|
| Either go to My Computer, Dial-Up Networking and Albury Local Internet... |


|
| ... Or, if you have created a shortcut on your desktop, double click it: |

|
|
This window will appear:
Type in your username and password in the appropriate boxes. Make sure there is a tick in the Save password box.Click on Connect and your modem should start dialling. |

|
|
Windows 95 will then display two windows, verifying your username and
password, and a confirmation of your connect speed and duration.
Leave the dialler running. You may minimise it if you wish by pressing on the box with the "-" in the top right of the window. You can now run your internet application programs - your browser, email etc. |

|
|
When you wish to conclude your on-line session, maximise the Dialler window
if necessary (double click on it in your bottom status bar) and click on
Disconnect.
|

|
|
When the dialler has closed the connection, the window will disappear.
For safety's sake (and your own peace of mind), disconnect your modem from the phone line when not in use. |
|